Quattro123.com
Use this information at your own risk.
As Jim has done and noted, it takes some more parts to make this brace work on a 100/200 type 44.
Suspension Mod: Audi parts Strut Tower Brace.
< Notice this is a 10V engine bay >
BY: Jim Furdyn
///Audi5TurboTech
Cherry Hill, NJ
011 1 856-482-1646
http://www.audi5turbotech.com/
Yahoo site:
http://autos.groups.yahoo.com/group/Audi5TurboTech/
Here's Jim's write up:
Upper Strut Tower Brace
Purpose: to install the upper strut tower brace from an Audi S4 (1992-1994) or an Audi S6 (1995-1996.5/97) onto the type 44 Audi chassis.
(The example will be a 1987 Audi 5000cs Turbo Quattro).
Part Requirements/ Parts Needed:
4A0 805 635 Retainer for connecting rod, left
(This is the part that sits above the strut tower, attached with the three (3) self-locking nuts and special cupped washer).
N 011 194 9 hex. nut, self-locking, M8 (if needed)
413 412 405 washer (if needed)
4A0 805 636 Retainer for connecting rod, right
(This is the part that sits above the strut tower, attached with the three (3) self-locking nuts and special cupped washer).
(see above for hardware requirements)
8A0 805 645 A Connecting rod/pipe
8A0 805 963 Plug for the end of the pipe, qty. 2 needed
N 011 670 16 Washer, for connecting bar/pipe, qty. 4 needed
N 902 218 03 Bolt, with hex. socket head, for connecting bar/pipe, qty. 4 needed
4A0 611 301 E Brake fluid reservoir, from S4/S6,
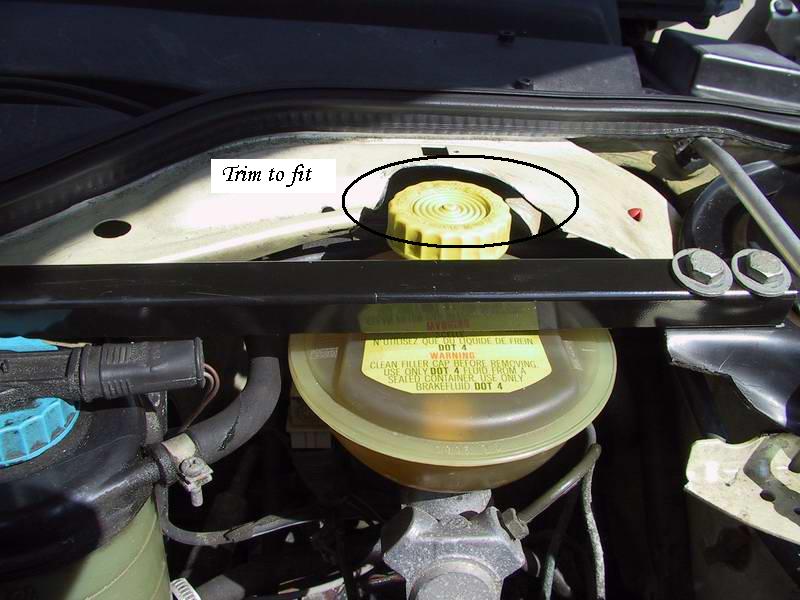
This is a lower profile reservoir and the filling cap is positioned aft of the reservoir therefore making clearance for the connecting rod/pipe.
893 611 817 B Plug, this is the rubber insert between the brake master cylinder and fluid reservoir. (Replace as needed)
Procedure:
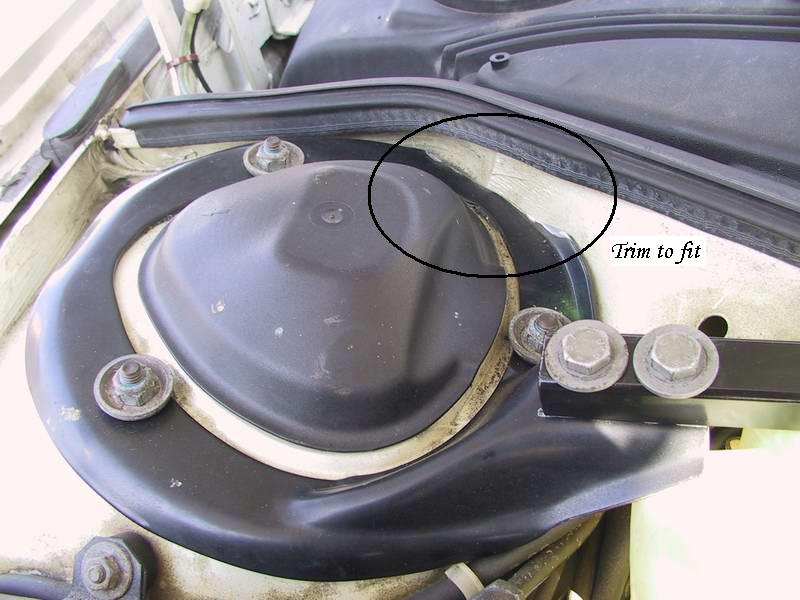
The right upper strut tower retainer needs to be modified in order to physically fit onto the top of the mounting surface on the upper strut attach point. Lay the retainer above the mounting point and use a marker to trace out the material that needs to be removed from the retainer. I used a cut-off wheel mounted to a high speed air grinder.

The left upper strut tower retainer does not need to be modified, but the area around where the retainer sits needs to be. On the type 44 cars (US vehicles) there is an unused bracket mounted to the right side of the left strut tower. The radiator overflow reservoir and an attaching clamp for an A/C line is on this piece. Using a high speed cut-off wheel, I removed half of this unused bracket. This allowed flush mounting of the left upper strut tower retainer. It will also be necessary to remove the screw for the A/C line, to give you more flexibility when fitting the left strut tower retainer. This A/C line runs under the weather cover on the driver’s side to a pressure sensor, and continues on to the HVAC box.
Remove the brake fluid reservoir and mock-up where the new reservoir is going to hit. Using a marker, trace out the material that needs to be removed from the metal brace that is part of the firewall and right above the brake fluid reservoir. (Use caution when cutting in this area. I would recommend that you cover the exposed master cylinder with a rag and take car to the vacuum line that runs under the metal area you are about to cut) (Replace the rubber plugs if damaged.

Install the new brake fluid reservoir from the S4/S6 (P/N 4A0 611 301 E)
Install the strut bar/pipe on the right side (passenger) and then take a measurement of the bar/pipe. Two (2) inches will need to be removed from the end of the pipe. Using a center punch, line up the holes from the left retainer to where they need to be drilled on the connecting bar/pipe. As you will notice, the holes on both ends of the connecting pipe are slotted. It is not necessary to slot your holes on the end you’re going to drill. I started with a 1/8” drill bit as a pilot hole. Make sure you drill this centered and square. Follow with a 5/16” and finish with a 25/64”drill bit. I finished my holes with a countersink to remove the edges of the hole(s)
Mount the connecting bar using bolt N 902 218 03, and washer N 011 670 1 (2 each per side).
Finish by applying paint ( or any other corrosion inhibiting product ) to the exposed metal edges you can cut on the right retainer and the bracket you cut in half and the metal piece above the brake fluid reservoir. Finally install the end caps to the end of the connecting bar/pipe.
The 1992-1994 S4 was listed in A10Q/Audi 100 Quattro 1989 >> 1994 in ETKA.
The final product:
Please notice these are 10V 200 bodies and engine bays.
Drivers side close up.

Passenger side close up

All Photos and write up content done by Jim.
200 20V install to come soon.
Peter S and Mike S also helped me obtain a list of part numbers and a magazine reference for comparison.
Thanks to Mike S and input from Peter S, they found a write up in the Quattro Quarterly winter 2004 (page 85?) AFAIK
...........and some parts numbers from the Family Album.
Strangely Version 5 doesn't list an S4 from 1992 - 1995.5
A6/S6 from 1996 up does. Listing the A6 produces the items.
The parts aren't mentioned until the end of the parts numbers like in a notes
listing.
If you want to upgrade your 200/100 chassis rigidity by installing an Audi
factory part from the "ur" S/4S6. As Bernie says: this is a tower brace not a
strut brace.............FWIW.
Deciphering the code:
4A0 is the body type
"805"
= section
8 sub type 05
That isn't always accurate, but it is true most of the time.
PARTS:
Left Mount:
4A0 805 635
Right mount:
4A0 805 636
BRACE:
4A0 805 645A
An alternative is the Bernie "Benz strut brace" (search the archives)
HTH -Scott by BOSTON

Note: The ETKA has an S6 / A6 application
where NO part is referenced in the picture at left below.
See Black highlighted left and right and "connecting pipe"